Camilla in Detail
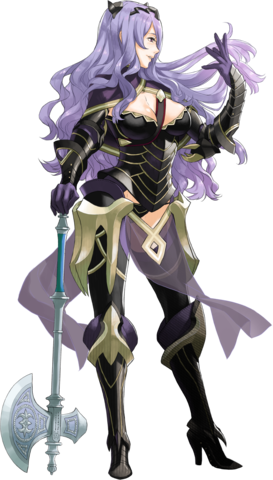
Camilla has been a commission that has rivaled Red Death in terms of learning how to create things, and the sheer number of materials / hours I spent working on it. It has the most pattern pieces of any commission I've ever done, as many were doubled (a pattern for foam pieces, a pattern for the cover of the foam). I'll tally them up soon because I'm curious to know. It has to be in the hundreds.
______________
I was also working with a few new materials I haven't used, or have rarely used.
The first would be EVA foam, which isn't too alarmingly new.
The second is Thibra, a thermoplastic, which I've never used before. I've never used Worbla either, but Thibra is said to come out smoother so I purchased that instead.
The third is 4-way stretch Ultrapreme & Metallic gold from Yaya Han's line of cosplay fabrics at JoAnn's.
Some new tools I worked with, or tools I don't use often:
Teflon sewing foot. Especially for the almost "sticky" metallic 4-way stretch fabrics. This foot glides the fabric through the machine without catching/pulling on it.
Dremel, for carving foam.
Heat gun, for melting thermoplastic.
Silicone mat (for working with the heat/thermoplastic)
I did study a few YouTube videos about others who have made this costume, before I jumped in to it. That helped immensely, and I can't imagine the time saved from that. I think back to Red Death where there were no tutorials or even remotely helpful information online about how to do those insane sleeves or how the cape was folded. Or how to make the extra large hat. So much trial and error.
That doesn't mean this costume didn't take a long time - I originally planned out 110 hours and the final tally was around 250. There were only a few things that I either messed up on or just felt like I needed to be done differently -- the bulk of the hours were just creating each piece, and it truly took a long time, even with direction.
I also went over budget... but going over time and budget is something that frequently happens when I take on a commission that is unlike anything I've ever done before. I've never made "armor"; never worked with thermoplastics; never carved foam. I didn't plot/plan for needing more materials for plus size since it's not like it's a Victorian gown; but it took a lot more materials than I thought.
I made sure to save every scrap and use remnants where I could - like doing the boot armor last, where the pieces that needed covered were the smallest.

Because I loved Yaya Han's idea of flexible armor using EVA foam and ultrapreme, I decided to go that route, even knowing it would take quite a while. There's a LOT to this costume, and I try to keep flexibility and comfort in mind when I can. It's already going to be "interesting" for a client to wear so many pieces, so much armor and some stiff pieces, so where I could add comfort, I tried.
My cheap sewing machine was on its' last leg and I think I put it into its' grave sewing too thick of foam for certain parts. I actually had to get out my expensive machine that I use solely for embroidery to handle the last 70 hours of the costume or so. I truly need industrial machines but my business just isn't there yet, but maybe one day...
______________
The costume consists of these parts:
(1) Wig
(1) Crown
(1) Cape
(1) Detachable/Adjustable Cape Strap
(1) Bodice
(2) Bicep Claw Armor
(2) Gauntlets
(2) Gloves
(1) Detachable White Elastic Belt for Hip Claws
(2) Hip Claws
(2) Gold Diamond Pieces w/ Silk
(1) Detachable/Adjustable Garter Belt
(2) Leg Warmers w/ Garters
(1) Bikini Panty
(2) Shin Armor
(2) Ankle Claw Bracelets
(2) Boots
(2) Detachable Boot Armor
______________
Other Social Media / In-Progress Photos
I've posted a few slideshows on my Instagram of the costume in-progress, but I have more photos I still need to share. Right now I have to jump into other projects, but the content is on my computer... and I can always go back and make a more in-depth video or post.
______________
Wig (Styled)

A lavender heat-safe synthetic lace front wig. I set it in rollers and combed through it to add more volume to the base wig, which was much flatter.
______________
Crown
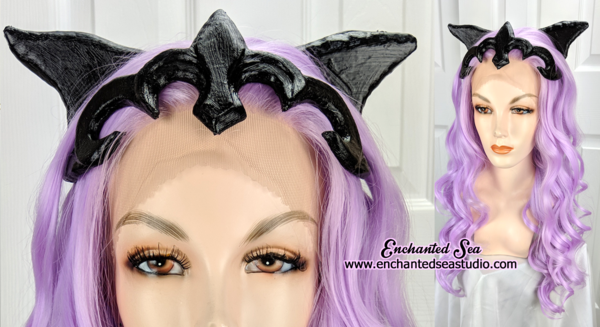
Here's a view of the wig before styling, and Camilla's crown. I did the crown first, as I thought it would be best to work on a small scale when attempting the foam carving and thermoplastics. I glued multiple layers of foam together, carved them with a dremel, covered them in Thibra, primed them, gave them a few coats of paint, and sealed them.
The front piece extends backwards and has a hair comb on each side. A strong wire was attached to this area and is what holds the "ears" up, so there isn't a 2nd band going across the top of the head.
.
See a slideshow of how the crown began here.
______________
Cape & Detachable Strap

This capelet was a little tricky due to it being a crossover, that's shorter in the front to show off more of the bust, and longer in the back. It also has a strap with small detailing matching the gold armor pieces.
The cape uses purple stretch velvet on the outside, and a black stretch knit on the inside. It has snaps on each of the shoulders (two hidden within; two on top) and snaps in both the front and back for the strap. The strap is adjustable via the back.
The gold trim was made from EVA foam cut into shape, and covered with gold 4-way stretch spandex.
I used a black twill strapping for the strap, and stitched red piping to each side. I then covered the "revealed" side with another layer of black.
The two gold pieces on the strap are carved from EVA foam and covered in Thibra, along with being primed/painted/sealed.
See how part of the cape was patterned & constructed here.

.
______________
Bodice

In hindsight I'd probably do the bodice either separate or slightly different, but how I approached it this time was to create an internal structure, and external armor.
The internal structure is a sort of corset made with the black Ultrapreme and heavy black cotton twill, as well as straight and spiraled steel boning. It closes in the back with a zipper. The outer corset is made from EVA foam pieces covered in Ultrapreme, and trimmed in gold bias tape. They were carefully arranged to overlap and stitched down.
I debated on putting a small corset back into the outer armor, but went with an adjustable velcro flap for ease of getting in/out.
The bust trim is EVA foam covered in gold metallic spandex.
.
See a slideshow of making the bodice panels here:
Part 1.
Part 2
.

______________
Bicep Claw Armor
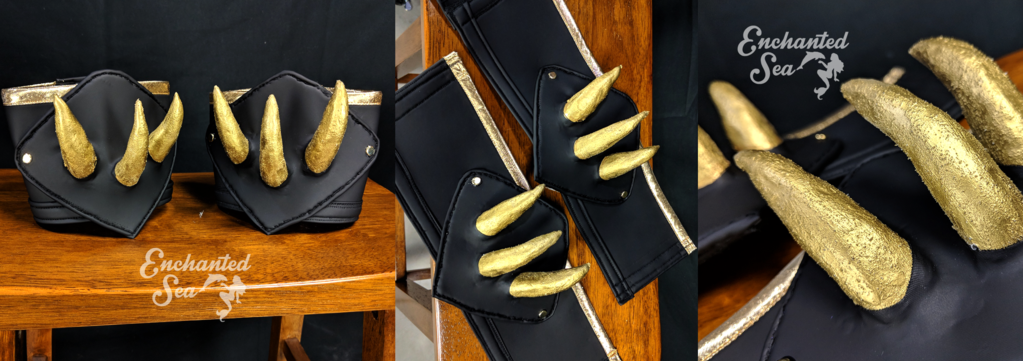
To create the claws, I carved EVA foam and covered it in Thibra. I then roughly sanded the claws to get the texture. I primed, painted, and sealed the claws.
These pieces needed to be flexible and I didn't want the claws to pop out, so glue was not going to be enough for my nerves. I glued the claws to the base, but also drilled horizontal channels through their bases. I then hand-stitched them to the thicker piece of EVA foam. After this, I added a bit of silicone caulking around the bases as well.
Once this dried, I used a piece of Ultrapreme with small holes cut out to stretch over the claws. I dabbed a bit of super glue around the claw base area, and stitched around the edge as I did with all the armor pieces.
I then created the base and made it partially adjustable with a velcro closure.
.
See how these were constructed here.
.

______________
Gauntlets
One of the first pieces of the "armor" I made. I cut pieces of foam and covered them in Ultrapreme, and finished off the edges. I carefully overlapped them and stitched them together.
After creating the top pieces and trimming them in gold bias, I stitched them to the base.
Velcro is used for the closure. Gold brads with the tails chopped off were used as studs and adhered with E6000.
.
Watch how the gauntlets were patterned here.
______________
Gloves

These were bought on Amazon - I don't always make every single part of a costume! I always try to save on "basic" stuff to keep pricing down.
______________
Hip Claws

By far the strangest part of a costume I have EVER made. And that's coming from someone who's done costumes with things called "crotch tiaras" and "but tiaras" and breastplates, and so on.
These were very difficult to pattern out, but once I did, I glued many layers of EVA foam together. I then carved them and sanded the edges.
After that, they went through a few different decisions, but I ultimately ended up covering them in Thibra, sanding the edges, priming both sides, putting layers of gold paint on both sides, and sealing both sides.
The bases / pauldrons (?) for the claws were made from EVA foam covered in Ultrapreme at the bottom, and purple spandex velvet on the top. I used a bowl to shape the EVA foam but it was difficult to get it to stay.
The purple needed to be covered from both sides so I created pieces that I stitched together, turned inside out, and inserted the foam.
After stitching black to purple, I had to attach the claws. The claws are rather heavy, although not insanely heavy. To make sure they were sturdy, I drilled holes in various places along the top of the claws. I stitched through them multiple times (using sturdy needles and needle-nose pliars). With a lot of hand-sewing, patience, and sore fingers, they were attached to the pauldrons. For an extra bit of stability I put a little glue behind the areas that touched, as well.
Three elastic straps were also hand-sewn to the bases on each side and contain snaps. Large snaps were sewn on either side of the purple parts to accommodate the gold diamond / loin cloth pieces.
The hip claws are attached to a sturdy elastic belt that is hidden underneath the bodice. This allows the straps to adjust and move with the wearer and put less strain on the attachments.
.
See a slideshow of the beginning stages of the hip claws here.
.
See how the claws were carved in a time lapse here.
.
See part of the hip pauldron construction here.
______________
Gold Diamond Pieces w/ Silk (Loin Cloth, of sorts)

EVA foam covered on both sides with gold metallic spandex were stitched, embroidered, and snaps were added at the edges.
Lavender silk chiffon was cut, narrow hemmed, and stitched to the gold pieces. I also used a bit of Fray Check where they were stitched to the gold, to help prevent fraying and reinforce the stitching.

.
______________
Leg Warmers w/ Garters & Belt

These leg warmers were patterned and cut from Ultrapreme. I then used small strips of EVA foam that were also carefully patterned, and covered them in gold spandex. They were pinned to the leg warmers and stitched down.
After this, I hemmed the top and bottom of the leg warmers, and added elastic garter straps for adjustability. There is also a garter belt they attach to underneath the bodice.
.
See how to construct adjustable straps here.

______________
Bikini Panty

The same method used in the leg warmers was used here - Ultrapreme, with EVA foam covered in gold spandex. I also used a soft cotton knit for the crotch lining, and foldover elastic for the top edge & straps. The bikini is adjustable via the side straps.
______________
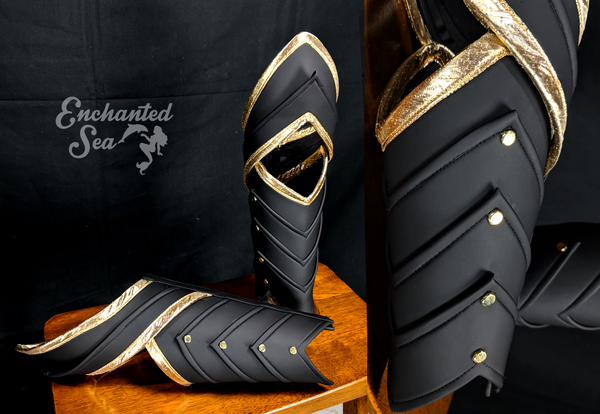
Shin Armor

If I were to make these again, I probably wouldn't make entirely out of foam, but they are still quite flexible. The main piece is thin EVA foam covered in Ultrapreme, with multiple pieces trimmed in gold bias layered and stitched on top. They close in the back with a reverse zipper (so they can be opened slightly at the bottom if needed for comfort.)
The purple pieces were made in similar fashion to the hip pauldrons, so they were covered from both sides. The armor piece follows the same process as the hip claws and other Thibra/Foam details. The strip that connects the pieces is EVA foam covered in gold spandex.

______________
Ankle Claw Bracelets

I almost didn't get a chance to make these because I was so far over budget and time, but squeezed them in at the last second. I carved the claws and relied on the Thibra to really shape and extend them. After priming, a few coats of paint, and sealing, I attached them in a similar fashion to the bicep claws. They are adjustable with Velcro.
______________
Boots & Detachable Boot Armor
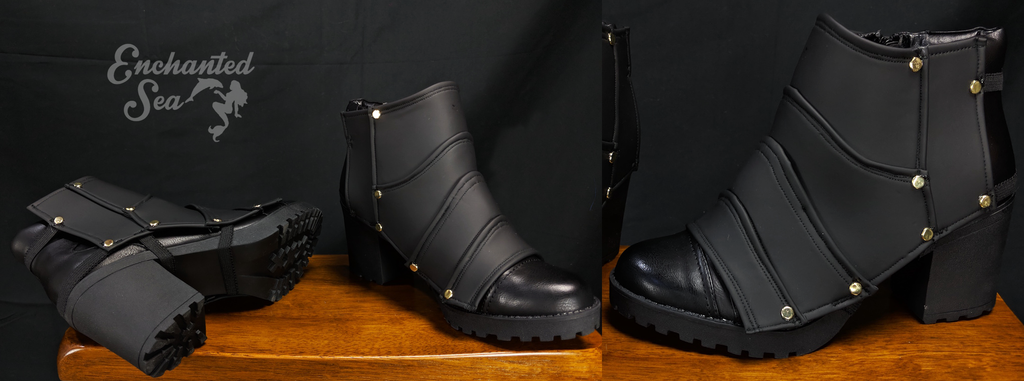
I patterned this boot armor on the boot with saran wrap and tape. After covering all the foam pieces in Ultrapreme, I carefully stitched certain parts together and left the center two flaps open slightly in the middle. This allows it to flex better with the extreme shape.

The armor is removable with elastic straps and snaps, so the boots can be used on their own as well! These boots were so comfortable I ended up buying myself a pair (they were on clearance!).
.